はじめに
このブログはSpring Bootで動いている。
これまでは、デプロイ後にsystemctl is-activeでサービスが起動しているかを確認していた。
ただ、systemctl is-activeだけだと、プロセスが起動していることは分かるが、Spring Bootアプリケーションとして正常に起動しているかまでは分からない。
そこで、Spring Boot Actuatorを使って、デプロイ後の確認にも使うようにした。
その手順を残しておく。
Nginxの設定
自分でwebサーバを管理している人だったら分かると思うが、/actuator/にアクセスがかなり来る。
webアプリが何で動いているかや使える情報がないか自動スキャンしているのだろう。
まず、nginxで/actuatorと/actuator/以下を返さないように設定をしておく。
location = /actuator {
    return 404;
}

location ^~ /actuator/ {
    return 404;
}
return 404じゃなくて、deny allにしてもいいかもしれないが、露骨に何かを隠している感がでてしまう。今回は404を返すようにした。(この記事を書いている時点で意味はないが……)
Spring Bootの設定
build.gradleのdependenciesに以下を追記する。
dependencies {
    implementation 'org.springframework.boot:spring-boot-starter-actuator'
}
Spring Bootのapplication.ymlに以下を書く。
management:
  endpoints:
    web:
      exposure:
        include: health
これで、/actuator/healthにアクセスすることで、起動状態を見ることができる。
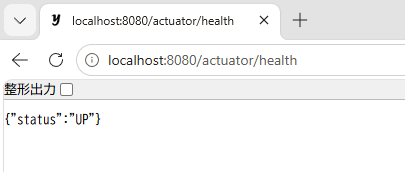
他にどういう設定ができるかは、公式のドキュメントを確認する。
デプロイスクリプト
以前、Spring BootアプリケーションをGithub Actionsでデプロイする記事を書いた。
そこで、サーバ側のデプロイスクリプトについて書いたが、そこでは、systemctl is-activeでアプリの状態を確認している。
今回、/actuator/healthにcurlを投げるように修正する。
新しくした、スクリプトは以下。
#!/usr/bin/env bash
set -euo pipefail

APP_DIR="<アプリのディレクトリ>"
RELEASES_DIR="$APP_DIR/releases"
SERVICE_NAME="app"
SOURCE_JAR="${1:?usage: deploy_uploaded_jar.sh /path/to/app.jar}"
KEEP_RELEASES=10

HEALTH_URL="http://127.0.0.1:8080/actuator/health"
HEALTH_RETRIES=30
HEALTH_INTERVAL=2

if [ ! -f "$SOURCE_JAR" ]; then
  echo "jar が見つかりません: $SOURCE_JAR"
  exit 1
fi

mkdir -p "$RELEASES_DIR"

SHA256=$(sha256sum "$SOURCE_JAR" | awk '{print $1}')
TIMESTAMP=$(date +%Y%m%d-%H%M%S)
NEW_JAR="app-${TIMESTAMP}-${SHA256:0:12}.jar"
NEW_JAR_PATH="$RELEASES_DIR/$NEW_JAR"

PREVIOUS_JAR=""
if [ -L "$APP_DIR/current.jar" ]; then
  PREVIOUS_JAR=$(readlink -f "$APP_DIR/current.jar" || true)
fi

wait_health() {
  local response_file
  response_file=$(mktemp)

  for i in $(seq 1 "$HEALTH_RETRIES"); do
    if curl -fsS "$HEALTH_URL" > "$response_file"; then
      if grep -Eq '"status"[[:space:]]*:[[:space:]]*"UP"' "$response_file"; then
        rm -f "$response_file"
        return 0
      fi
    fi

    echo "ヘルスチェック待機中... ($i/$HEALTH_RETRIES)"
    sleep "$HEALTH_INTERVAL"
  done

  echo "ヘルスチェックに失敗しました: $HEALTH_URL"
  echo "---- health response ----"
  cat "$response_file" || true
  rm -f "$response_file"

  return 1
}

rollback() {
  if [ -n "$PREVIOUS_JAR" ] && [ -f "$PREVIOUS_JAR" ]; then
    echo "前回の jar に戻します: $PREVIOUS_JAR"
    ln -sfn "$PREVIOUS_JAR" "$APP_DIR/current.jar"

    if sudo systemctl restart "$SERVICE_NAME"; then
      if wait_health; then
        echo "rollback succeeded"
        return 0
      fi
    fi

    echo "rollback 後のヘルスチェックにも失敗しました"
    return 1
  fi

  echo "戻せる前回の jar がありません"
  return 1
}

install -m 644 "$SOURCE_JAR" "$NEW_JAR_PATH"
rm -f "$SOURCE_JAR"

ln -sfn "$NEW_JAR_PATH" "$APP_DIR/current.jar"

if ! sudo systemctl restart "$SERVICE_NAME"; then
  echo "$SERVICE_NAME の restart に失敗しました"
  rollback || true
  exit 1
fi

if ! wait_health; then
  echo "$SERVICE_NAME のヘルスチェックに失敗しました"
  rollback || true
  exit 1
fi

find "$RELEASES_DIR" -maxdepth 1 -type f -name 'app-*.jar' -printf '%T@ %p\n' \
  | sort -nr \
  | tail -n +$((KEEP_RELEASES + 1)) \
  | cut -d ' ' -f 2- \
  | xargs -r rm -f

echo "deployed: $NEW_JAR"
wait_healthを使うことで、デプロイして、アプリ起動後、http://127.0.0.1:8080/actuator/healthにcurlを投げて状態を確認している。
curlして{"status":"UP"}が返ってきたら、アプリが生きているということで、起動成功扱いにしている。
返ってこなかった場合は、2秒sleepして、もう一回試すという流れだ。
これで、プロセス自体は起動はしたけど、アクセスはまだできないということを防げる。
DBとの連携
このブログは、DBを使っておらず、Spring Boot単体だ。
状態確認はwebが生きているかだけみればよく、Spring Boot Actuatorを使わなくても、http://127.0.0.1:8080/にcurlを投げて、200が返ってこればいい。
せっかくなので、テストとして、DBと連携するアプリを作って、Spring Boot Actuatorの良さを確かめようと思う。
postgresql
Dockerでpostgresqlをつくる。以下のようなcompose.ymlを作り、docker compose up -dする。
services:
  postgres:
    image: postgres:16
    container_name: sample-actuator-db-postgres
    environment:
      POSTGRES_DB: sampledb
      POSTGRES_USER: sampleuser
      POSTGRES_PASSWORD: samplepass
    ports:
      - "5432:5432"
    volumes:
      - sample-actuator-db-data:/var/lib/postgresql/data

volumes:
  sample-actuator-db-data:
Spring Bootアプリケーション
Dockerで作ったpostgresqlと連携するSpring Bootアプリを作る。
build.gradleに以下を追加し、Spring bootやActuator、PostgreSQL JDBC Driverを使えるようにする。
plugins {
    id 'org.springframework.boot' version '4.1.0'
    id 'io.spring.dependency-management' version '1.1.7'
}

dependencies {
    implementation 'org.springframework.boot:spring-boot-starter-webmvc'
    implementation 'org.springframework.boot:spring-boot-starter-actuator'
    implementation 'org.springframework.boot:spring-boot-starter-jdbc'

    runtimeOnly 'org.postgresql:postgresql'

    testImplementation 'org.springframework.boot:spring-boot-starter-test'
}
Dockerで建てたpostgresqlに接続するよう、application.ymlは次のようにする。
spring:
  datasource:
    url: jdbc:postgresql://localhost:5432/sampledb
    username: sampleuser
    password: samplepass

management:
  endpoints:
    web:
      exposure:
        include: health
最後に、適当なSpring Bootのメインクラスを作る。
package com.example.sample;

import org.springframework.boot.SpringApplication;
import org.springframework.boot.autoconfigure.SpringBootApplication;

@SpringBootApplication
public class SampleApplication {

    public static void main(String[] args) {
        SpringApplication.run(SampleApplication.class, args);
    }
}
これで、bootRunタスクを実行し、http://localhost:8080/actuator/healthにアクセスする。
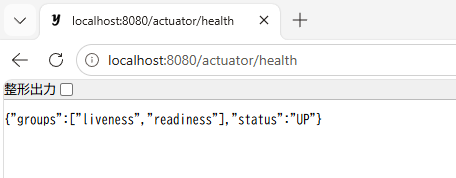
"status":"UP"が表示される。
postgresqlを落とす
Dockerで起動したpostgresqlをdocker compose stopで停止する。
その後、http://localhost:8080/actuator/healthにアクセスする。
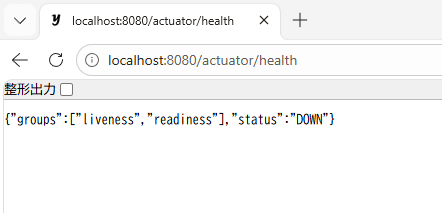
"status":"DOWN"が表示される。
これで、DBとの連携も試せた。